Performant rendering of variable height content using virtual lists in AngularJS
Unlock faster web app UX with AngularJS virtual lists for rendering variable-height content efficiently in bespoke development.
Displaying lists of data is a common task when developing an application, often a seemingly trivial task when the amount of content early on in a project is limited. However, after launch the amount of content & users viewing it will increase dramatically over time, so displaying all of the data at once will quickly become a serious performance problem due to the amount of HTML generated by the application which the user's web browser has to parse and render.
In a recent client project, we were tasked with creating a calendar that would all display company events which users could filter or navigate through on a week-by-week basis, without needing to reload the page. Early iterations of the feature worked as intended, however, as the amount of events and information being displayed to the user continuously grew, performance started to degrade. In this blog post we will discuss different methods on how to break up the rendering of content and explore the way in which we implemented a type of "virtual list", explaining the trade offs we had to make.
As always, the example project for this blog post can be found at the Codevate github page. We've also deployed it so you can check out the final result straight away.
UI pattern showdown
When displaying large amounts of information there are three common user-interface design patterns used:
- Pagination
- Infinite scroll
- Virtual list
Pagination
The process of dividing a document into discrete pages, either electronic pages or printed pages. (https://en.wikipedia.org/wiki/Pagination accessed June 26, 2017).
Pagination is the most common way of separating lists of content into a smaller set of digestible data. Pagination lends itself to goal-oriented finding tasks, such as finding a specific record from a list of records in a database. Additionally, pagination assists the user in finding a record they have previously found. If the user roughly knows where they found the record previously, they can use the pagination page number navigation to find the record again.
![]()
However, the user-experience aspect of pagination can suffer by requiring extra actions to navigate to the next page of content. It can also be a balancing act of displaying enough data per page without compromising performance.
Infinite scroll
A web-design technique that loads content continuously as the user scrolls down the page, eliminating the need for pagination. (https://www.nngroup.com/articles/infinite-scrolling/ accessed June 26, 2017)
Infinite scroll is a great design technique for keeping users on your site for extended periods of time. Allowing the user to stream new content indefinitely has been embraced and popularised by social media sites such as Facebook and Twitter. By replacing the pagination navigation with a limitless supply of content the friction of receiving the next set of data is greatly reduced, therefore audiences are engaged for longer periods of time. For social media sites, keeping users engaged longer allows them to show more ads, thus generating more revenue.
Credit: ngInfiniteScroll
Infinite scroll does not come without trade-offs though. After scrolling for long periods of time the browser starts to slow down until eventually crashing due to the amount of content on the page. As more and more content is loaded the amount of DOM elements on the page grows. Each time the user scrolls, the browser must paint each of the elements which takes increasingly longer as more content is loaded on the page.
Additionally, a common design fault is replacing pagination with the infinite scroll where the pagination tools would provide the user a much better user experience. The lack of pagination does not allow the user to bookmark their current location, so if they want to go back to a certain point in the feed the next time they visit your site they are forced to continuously scroll until they find where they were previously. This is prevalent with e-commerce sites that load products using infinite scroll and do not provided suitable filters to assist their users in finding the products they have found previously. Infinite scroll also breaks down when a user selects an item from the list and then proceeds to navigate back to the list view which may start them at the top of the list again.
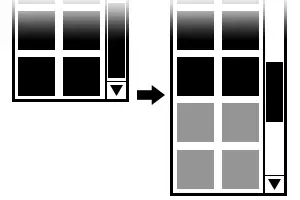
Virtual list
Showing a subset of data so that not all of the elements are rendered on the page.
A virtual list is used when a lot of information needs to available to the user but rendering all of the content reduces the performance of the web page. Much like the infinite scroll, the design behind a virtual list is to allow the user to keep scrolling without the use of navigation. With a virtual list, when an element is no longer visible to the user it is hidden/removed so that the browser does not have to render it. This provides a huge performance advantage over the infinite scroll when rendering a lot of content or content that is DOM heavy.
A great example of a virtual list is the react-virtual-list component.
Creating a virtual list that supports content with varying heights
There is, however, one big downside to most virtual list implementations used by projects within the AngularJS and React ecosystem: the list items must be the same height. This requirement is imposed so that the library can correctly calculate the total height of the list as if it were to be rendered without any virtualisation. Knowing the total height of the list allows the library to create a functional scroll bar which can be displayed and interacted with by the user.
This constraint did not fit our requirements since the view we had designed could show a variable number of events of wildly different heights due to various factors such as the user's applied filters or having an embedded Google Map in the event card. Let's begin implementing a virtual list that can support content with varying heights!
Starting a new project
We will be using npm and Bower to bring in our dependencies, and we will be using Grunt as our task runner. First, let's create a new npm project with npm init. Feel free to press the enter key for all of the questions as they aren't important to this demonstration.
Now we'll include our build dependencies:
npm install grunt grunt-babel grunt-concurrent \
    grunt-angular-templates grunt-contrib-clean grunt-contrib-concat \
    grunt-contrib-copy grunt-contrib-uglify grunt-contrib-watch \
    load-grunt-config time-grunt \
    babel-preset-es2015 babel-plugin-transform-object-assign \
    angular jquery \
    --save-dev
Here we have installed Grunt and a couple of plugins so that we can use ES6 features via Babel safely in older browsers, plus our front-end dependencies. With them installed we can start creating our basic build process to concat, transpile, and minify the JavaScript.
Setting up the build process
First we need a Gruntfile so that Grunt knows which plugins we want to use and so that we can outline our build steps.
'use strict';

module.exports = function (grunt) {
  var path = require('path');

  require('time-grunt')(grunt);

  require('load-grunt-config')(grunt, {
    jitGrunt: {
      staticMappings: {
        ngtemplates: 'grunt-angular-templates',
      },
    },
  });
};
View on GitHub
Create a new directory in the root of the project and name it grunt. Inside this directory create a new file named aliases.yml, this is where we will outline our build steps. Copy the following into the aliases.yml file:
build:
  - copy
  - clean:js
  - clean:vendors
  - ngtemplates
  - concat
  - babel
  - concurrent:minify

default:
  - build
  - watch
View on GitHub
With our build steps in place we need to add each of the plugin config files. You can find these in the grunt directory of the github project.
With the Grunt tasks set-up we are now able to start the build process by simply typing grunt in the command line. Additionally, as we have added a watch step to the default task, whenever we change an src file Grunt will automatically run.
Implementing the virtual list
To begin with we need to create a new module for our demo app:
// ./src/app.js

(function (angular) {
  angular.module('app', []);
})(angular);
View on GitHub
We also need to create our base HTML page to render our Angular app:
<!-- ./src/index.html -->

<!DOCTYPE html>
<html ng-app="app">
<head>
  <link rel="stylesheet" type="text/css" href="app.css">
</head>
<body>
  <h2>VirtualListApp</h2>

  <script src="vendors.min.js"></script>
  <script src="bundle.min.js"></script>
  <script src="templates.js"></script>
</body>
</html>
View on GitHub
Now that we have our index.html file set-up and loading our build files we can begin creating the virtual list.
We are going to need to generate some example data so that we can test if our implementation correctly virtualises a list of items wth varying heights. Create a basic demo-list component like below (we'll add the data generation in the next step):
// ./src/components/demo-list/demo-list.js

(function (angular) {
  angular
    .module('app')
    .component('demoList', {
      controller: DemoListController,
      templateUrl: 'src/components/demo-list/demo-list.tpl.html',
    });

  function DemoListController() {
    const vm = this;
  }
})(angular);
View on GitHub
This component is going to act as our stateful container component, which would normally be responsible for fetching the items to list via an ajax request. Instead, we will create 1000 random items using two factories: one will create items with small amount of data and the other will create them with a few additional properties. Add the following to the demo-list component created above after line 12:
vm.$onInit = () => {
  vm.items = createRandomItemList();
};

const createRandomItemList = () => {
  const itemFactories = {
    1: createSmallItem.bind(null),
    2: createLargeItem.bind(null),
  };

  return Array(1000).fill().map((_, id) => {
    const type = Math.floor((Math.random() * 2) + 1);
    return itemFactories[type](id);
  });
};

const createSmallItem = (id) => ({
  id: id,
  title: `Entry #${id}`
  isLarge: false,
});

const createLargeItem = (id) => ({
  id: id,
  title: `Entry #${id}`,
  isLarge: true,
  project: Math.floor((Math.random() * 15000) + 1),
  postcode: 'B7 4BB',
  projectManager: 'Alex',
});
View on GitHub
If you debug (or console.log) the vm.items object property you will see a mixture of small and large elements in the array.
Now that we have our example dataset, we can start to create our virtual list but first we need to create basic template to render the component:
<!-- ./src/components/demo-list/demo-list.tpl.html -->

<virtual-list items="$ctrl.items"></virtual-list>
View on GitHub
Create a virtual-list component which takes an array of items to display as a binding like so:
// ./src/components/virtual-list/virtual-list.js

(function (angular) {
  angular
    .module('app')
    .component('virtualList', {
      controller: VirtualListController,
      templateUrl: 'src/components/virtual-list/virtual-list.tpl.html',
      bindings: {
        'items': '<',
      },
    });

  VirtualListController.$inject = ['$timeout'];

  function VirtualListController($timeout) {
    const vm = this;

    vm.$onInit = () => {
      $timeout(function () {
        const renderedItems = {};

        // Loop through each of the rendered items, creating an object keyed by each
        // elements offsetTop and storing the element itself as the value.
        $('.js-list-row').each(function () {
          const row = $(this)[0];
          renderedItems[row.offsetTop] = row;
        });

        vm.renderedItems = renderedItems;
        // The scrollers height with be the same as the last elements offsetTop
        vm.scrollerHeight = Object.keys(renderedItems).slice(-1)[0];
      });
    };
  }
})(angular);
View on GitHub
And create the matching template:
<!-- ./src/components/virtual-list/virtual-list.tpl.html -->

<div class="container">
  <div virtual-list-scroller sizer-height="$ctrl.scrollerHeight" rendered-items="$ctrl.renderedItems">
    <li ng-repeat="item in $ctrl.items track by item.id" class="js-list-row">
      {{ ::item.title }}

      <div ng-if="item.isLarge">
        <p>{{ ::item.project }}</p>
        <p>{{ ::item.postcode }}</p>
        <p>{{ ::item.projectManager }}</p>
      </div>
    </li>
  </div>
</div>
View on GitHub
There are a few things going on here so let's break it down.
Initially, when the virtual-list component is created and initialised, the ng-repeat directive will loop through each of the elements in the items array passed to the component and render them on the page. If the item is large then it will render the additional details.
Looking to the virtual-list controller, you can see that we use Angular's $timeout service to wrap the functionality within the $onInit function. We are doing this as we want the code to run after the content has been loaded. When using $timeout (and the standard setTimeout function) the inner function will be added to the back of the task queue once the timer has expired. By using the $timeout service with no delay we are effectively asking the JavaScript engine to execute our code once it is finished doing whatever else is in the task queue. In this case we are using the $timeout to run our code after the ng-repeat has finished rendering the content.
As the items have rendered we can now loop through each of them and find their top position. The resulting object contains each of the rendered items, keyed by their top position. This object is then passed to the virtual-list-scroller which we will be creating next.
Calculating the visible elements
At this point in the demo we have our data being generated in place of a real ajax request, a virtual-list component which has created an object of all of the rendered items keyed by their offsetTop and the height of the list. We can now implement our virtual-list-scroller directive which will be responsible for toggling the visibility of the element in the list by calculating the user's current scroll position relative to the offsetTop values of the rendered elements. The aim of this directive is as follows:
- Create a functional artificial scroll bar so that the user can scroll to a certain position in the list quickly.
- Calculate the user's current scroll position.
- Determine the elements that need to be displayed and hide the remaining elements.
With these points in mind, we need to first create a virtual-list-scroller directive like so:
// ./src/components/virtual-list-scroller/virtual-list-scroller.js

(function (angular) {
  angular
    .module('app')
    .directive('virtualListScroller', [function () {
      const OFFSET_COUNT = 10;

      let scrollerSizerElement = null;
      let scrollerOffsetElement = null;
      let scrollerElement = null;

      return {
        restrict: 'A',
        transclude: true,
        scope: {
          sizerHeight: '<',
          renderedItems: '<',
        },
        templateUrl: 'src/components/virtual-list-scroller/virtual-list-scroller.tpl.html',
        link: function (scope) {
          scrollerElement = $('.js-scroller');
          scrollerSizerElement = $('.js-scroller-sizer');
          scrollerOffsetElement = $('.js-scroller-offset');
        },
      };
    }]);
})(angular);
View on GitHub
And create the matching template file:
<!-- ./src/components/virtual-list-scroller/virtual-list-scroller.tpl.html -->

<div id="scroller__container">
  <div class="js-scroller">
    <div class="js-scroller-sizer scroller__sizer"></div>
    <ul class="js-scroller-offset scroller__offset" ng-transclude></ul>
  </div>
</div>
View on GitHub
So far, this directive doesn't do all that much. It loads a template, assigns local variables to the elements in the template, and allows the user of the directive to transclude content through it.
Let's tackle our first problem, creating a scrollbar that works the same as if the list was not virtualised. In the virtual-list component we determined that the height of the list will be offsetTop of the last element and we passed that into the virtual-list-scroller directive. We can now create a watcher for the sizerHeight scope variable which will be responsible for setting the size of the scroller__sizer:
scope.$watch('sizerHeight', resizeScrollerSizer);
View on GitHub
const resizeScrollerSizer = height => {
  if (scrollerSizerElement === null) {
    return;
  }

  scrollerSizerElement.height(height);
};
View on GitHub
With the scroller__sizer height set, we can move on to creating a scroll event listener so that we can determine which events need to be displayed. Within the link function, add the following event listener:
scrollerElement.on('scroll', () => handleScroll(scope.sizerHeight, scope.renderedItems));
View on GitHub
And also add the handleScroll function to the directive:
const handleScroll = (sizerHeight, renderedItems) => {
  // Get the user's current scroll position
  const scrollPosition = scrollerElement.scrollTop();

  // If we are already at the bottom of the list then don't do anything else
  if (scrollPosition >= sizerHeight) {
    return;
  }

  // Create an array containing the offsetTop values of each of the rendered items
  const rowPositions = Object.keys(renderedItems);
  // Find the closest row to our current scroll position
  const closestRowIndex = findClosestNumberIndex(scrollPosition, rowPositions);

  // Find the rows that we need to render using the OFFSET_COUNT buffer
  const start = (closestRowIndex - OFFSET_COUNT) >= 0 ? (closestRowIndex - OFFSET_COUNT) : 0;
  const end = (closestRowIndex + OFFSET_COUNT) <= rowPositions.length ? (closestRowIndex + OFFSET_COUNT) : rowPositions.length;
  const indexes = rowPositions.slice(start, end);

  // Hide the rows we don't need to render and show the ones that do need to be rendered
  rowPositions.forEach(position => {
    if (indexes.indexOf(position) === -1) {
      $(renderedItems[position]).hide();
    } else {
      $(renderedItems[position]).show();
    }
  });
};
View on GitHub
The handleScroll listener is responsible for displaying the items that we want to display and hiding the rest. To find the elements we want to keep, we must first find the element which is closest to the current scroll position. To do this we pass the current scroll position and an array of the offsetTop values to the findClosestNumberIndex function.
The findClosestNumberIndex is implemented like so:
const findClosestNumberIndex = (numberToFind, numbers) => {
  let current = numbers[0];
  let currentIndex = 0;
  let difference = Math.abs(numberToFind - current);

  for (let val = 0; val < numbers.length; val++) {
    const newDifference = Math.abs(numberToFind - numbers[val]);

    if (newDifference < difference) {
      difference = newDifference;
      current = numbers[val];
      currentIndex = val;
    }
  }

  return currentIndex;
};
View on GitHub
This function loops through each of the element positions, calculating the difference between each position and the numberToFind (which is our scroll position). The index of the closest item is then returned.
Continuing with our handleScroll function, with the closestRowIndex returned from the findClosestNumberIndex function we can now buffer elements either side of the current index (in this case 10). To show these elements to the user we can simply iterate over all of the rowPositions and hide the corresponding element if the offsetTop does not appear in our indexes array. If the offsetTop value is present then we show the element.
Quick recap
So far we have initially rendered all of the items on the page, calculated their offsetTop and then hidden the elements which don't appear in our buffer. If you are following along you'll notice that if you scroll you will eventually see no elements in the list, but if you open up developer tools you can see that the items are being correctly hidden and shown. So why aren't the elements showing?!
Syncing the offset
The issue here is that after scrolling down so far, we scroll past the scroller__sizer height. To solve this we need to update the scroller__offset Y position so that it is in sync with the first element in the "elements to show" buffer.
To do this we need to add a new function which updates the offset element with the new value:
const updateOffsetYPosition = position => {
  scrollerOffsetElement.css({ transform: `translateY(${position}px)` });
};
View on GitHub
We can then update the handleScroll event listener:
const handleScroll = (sizerHeight, renderedItems) => {
  // ...

  if (scrollPosition >= sizerHeight) {
    // Ensure the offset does not exceed the scroller__sizer height
    updateOffsetYPosition(sizerHeight);
    return;
  }

  // ...

  // Being to update the offset's Y position once we have rendered at least 10 elements
  const updatePosition = Math.max(0, closestRowIndex - OFFSET_COUNT) === 0 ? 0 : indexes[0];
  updateOffsetYPosition(updatePosition);
};
View on GitHub
Here we call the updateOffsetYPosition when half of the elements in our buffer have been scrolled past, as the OFFSET_COUNT is used to added a buffer to the start and the end of our closestRowIndex. Now that the scroller__offset is correctly translating you'll see that the scroll now works correctly.
Summary
In this article, we tackled displaying DOM heavy content in a virtual list and found a solution which is currently working in a production application. However, this implementation is not without it's downsides: it requires all of the items to be rendered before they are then subsequently hidden which leads to a high start up cost, although based on our use-case it was apparent this was the most pragmatic solution to the problem.
Fast track your bespoke software project with us
"Codevate was the only company who ‘got’ our idea. We’ve worked with them to incrementally digitise most of our business processes with bespoke software."
- Complimentary scoping call
- At-a-glance feasibility analysis
- No obligation high-level proposal
- Work with an expert to evolve your idea