How to accept payments with Stripe in Symfony web apps
Enable secure in-app payments by integrating Stripe in Symfony for seamless monetisation in custom web development.
In this post I'm going to demonstrate how to accept payments in a Symfony project by integrating Stripe, a cloud-based platform (PaaS) that offers secure payment processing and recurring billing for all major debit & credit cards from customers in every country. Card details are some of the most sensitive customer data you can store, and while it may be tempting to handle payment processing yourself, both your software and business must be PCI DSS compliant and reguarly audited to confirm this fact. Stripe minimises this burden by ensuring that no sensitive information passes through your application server, instead, they capture payment details client-side and send back a tokenised representation you can then use to make a charge with their API.
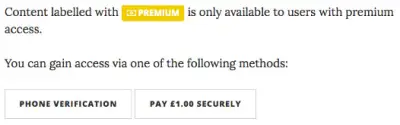
To add some real-world context I've implemented a companion web app – a blog site with premium content which we'll modify so that users can pay a nominal fee to access. I'll cover how to use Stripe's pre-built UI components and PHP SDK, as well as how to utilise webhooks to handle refund events. Therefore, this article does assume you have a development environment capable of running a Symfony project and some experience with the framework. If you're looking to start using Symfony then I'd recommend Knp University's screencast on Joyful Development with Symfony 3. You may notice when running the web app that users can also verify their phone number to upgrade to premium, if you're interested in learning more about this feature then check out our previous article "How to verify phone numbers with PHP, Symfony, and Twilio".
Setting up the project
Let's begin by cloning the project repository and checking out a new branch at the point where I've yet to do the integration (you can always switch to the master branch later to see the finished product):
git clone https://github.com/Codevate/blog-twilio-stripe-integration.git && cd $_
git checkout -b develop v1.0
Install the Stripe PHP SDK with composer:
composer require stripe/stripe-php
Create the database, set up the schema, and load the blog post & user data fixtures:
php app/console doctrine:database:create --if-not-exists
php app/console doctrine:schema:update --force
php app/console doctrine:fixtures:load
Start the built-in web server:
php app/console server:run
In a separate terminal window, use ngrok to tunnel to the local server so that the Stripe test account can send requests to it during development:
ngrok http 8000
Note: Even with the tunnel we're still developing locally, so you'll want to edit app_dev.php and comment out the check that prevents access by remote IPs (lines 13-19).
You should then see output similar to the following, which gives your forwarding address:
Session Status                online
Version                       2.2.8
Region                        United States (us)
Web Interface                 http://127.0.0.1:4041
Forwarding                    http://xxxxxxxx.ngrok.io -> localhost:8000
Forwarding                    https://xxxxxxxx.ngrok.io -> localhost:8000
When visiting http://xxxxxxxx.ngrok.io/premium (make sure to use your actual ngrok ID) you should see this:
Card payments with Stripe
Now that the project is up and running, you'll need to create a Stripe account. It's free to get started as the account will be in test mode, meaning you can't take payments with genuine card information. Get your test API keys and add them to parameters.yml:
parameters:
    # ...
    stripe_public_key: pk_test_xxxxxxxxxxxxxxxxxxxxxxxx
    stripe_secret_key: sk_test_xxxxxxxxxxxxxxxxxxxxxxxx
Capturing card details
We'll be using Stripe Elements to control the look and feel of our payment page, however, there's also Stripe Checkout which offers an excellent and responsive pre-built payment form you can embed. These UI components are created & hosted by Stripe and inserted into the page dynamically. We won't spend much time styling the card element but you can view all the available options and some examples to get an idea of how flexible it is.
Start by including the Stripe.js client library in the top-level template file base.html.twig. Stripe recommends loading the client library on every page as it assists their fraud detection:
<script src="https://js.stripe.com/v3/"></script>
Next we'll need to update the payment.html.twig template to render our payment form (we'll implement the controller action that builds it afterwards). Add the following to the content twig block:
{{ form_start(form, {attr: {id: form.vars.id}}) }}
    <div class="form-group">
      <label for="card-element">
        Credit or Debit Card
      </label>
      <div id="card-element" class="form-control"></div>
      <div id="card-errors" class="help-block" role="alert"></div>
    </div>
    {{ form_widget(form.token) }}
{{ form_end(form) }}
You may have noticed our form only has one field called token. This is intentional, as we'll be using Stripe.js to inject a UI component into the card-element container that will securely collect all the necessary card details, displaying any error events it emits in the card-errors container. We also need to hook into the form's submit event so that we can transform the payment details into a token and submit that to our backend instead.
Add the following to the javascript twig block:
<script type="text/javascript">
  var form = document.getElementById('{{ form.vars.id }}');
  var errors = document.getElementById('card-errors');

  var stripe = Stripe('{{ stripe_public_key }}');
  var elements = stripe.elements();
  var card = elements.create('card');

  card.mount('#card-element');
  card.addEventListener('change', function(event) {
    if (event.error) {
      errors.textContent = event.error.message;
      form.classList.add('has-error');
    } else {
      errors.textContent = '';
      form.classList.remove('has-error');
    }
  });

  form.addEventListener('submit', function(event) {
    event.preventDefault();

    stripe.createToken(card).then(function(result) {
      if (result.error) {
        errors.textContent = result.error.message;
        form.classList.add('has-error');
      } else {
        document.getElementById(' form.children.token.vars.id }}').setAttribute('value', result.token.id);
        form.submit();
      }}
    });
  });
</script>
Finally, we need to build the Symfony form that's rendered in our twig template so we capture the tokenised representation of the card that will be used in future Stripe API calls. In the companion project, open PremiumController.php and add the following code to the stubbed paymentAction method:
$form = $this->get('form.factory')
  ->createNamedBuilder('payment-form')
  ->add('token', HiddenType::class, [
    'constraints' => [new NotBlank()],
  ])
  ->add('submit', SubmitType::class)
  ->getForm();

  if ($request->isMethod('POST')) {
    $form->handleRequest($request);

    if ($form->isValid()) {
      // TODO: charge the card
    }
  }

return $this->render(':premium:payment.html.twig', [
  'form' => $form->createView(),
  'stripe_public_key' => $this->getParameter('stripe_public_key'),
]);
Important: While you should be serving your application over HTTPS anyway, it's imperative that this route is secured with a modern version of TLS to help prevent man-in-the-middle attacks that steal the token.
Now you should be able to visit http://xxxxxxxx.ngrok.io/premium/payment, put in some test card numbers, and get a valid token back. There's also some client-side validation included to catch out certain issues like expiry dates:

Creating a charge
Once we have a token we can use it to create a charge to the user's card. For this example we'll be issuing a one-time charge, however, with Stripe it is possible to create & save a customer reference so you don't have to keep requesting their card details, or even have two-step payments (authorise & capture).
Let's begin by adding a field to our User entity class to record a successful charge ID:
/**
  * @ORM\Column(name="charge_id", type="string", length=255, nullable=true)
  */
protected $chargeId;
Next, we should define the currency and amount we wish to charge in config.yml:
parameters:
    # ...
    payment:
        currency: GBP
        decimal: true
        premium_amount: 1
The decimal field is important since Stripe's API expects the charge amount to be in the currency's smallest unit, so we'll need to configure whether the amount should be multiplied by 100.
Now we can implement a service to charge the user using the Stripe API and set their premium status. It's worth noting that charges succeed or fail straight away, so there's no need to rely on a webhook and as long as we don't encounter an exception then payment was successful.
Create a new file in src/AppBundle/Client/ called StripeClient.php and add the following code:
<?php

namespace AppBundle\Client;

use AppBundle\Entity\User;
use Doctrine\ORM\EntityManagerInterface;
use Psr\Log\LoggerInterface;
use Stripe\Charge;
use Stripe\Error\Base;
use Stripe\Stripe;

class StripeClient
{
  private $config;
  private $em;
  private $logger;

  public function __construct($secretKey, array $config, EntityManagerInterface $em, LoggerInterface $logger)
  {
    \Stripe\Stripe::setApiKey($secretKey);
    $this->config = $config;
    $this->em = $em;
    $this->logger = $logger;
  }

  public function createPremiumCharge(User $user, $token)
  {
    try {
      $charge = \Stripe\Charge::create([
        'amount' => $this->config['decimal'] ? $this->config['premium_amount'] * 100 : $this->config['premium_amount'],
        'currency' => $this->config['currency'],
        'description' => 'Premium blog access',
        'source' => $token,
        'receipt_email' => $user->getEmail(),
      ]);
    } catch (\Stripe\Error\Base $e) {
      $this->logger->error(sprintf('%s exception encountered when creating a premium payment: "%s"', get_class($e), $e->getMessage()), ['exception' => $e]);

      throw $e;
    }

    $user->setChargeId($charge->id);
    $user->setPremium($charge->paid);
    $this->em->flush();
  }
}
Don't forget to register it in the container by adding the following to services.yml:
app.client.stripe:
    class: AppBundle\Client\StripeClient
    arguments: ['%stripe_secret_key%', '%payment%', '@doctrine.orm.entity_manager', '@logger']
Now we can address the TODO in the PremiumController::paymentAction method by calling the client service to charge the user:
try {
  $this->get('app.client.stripe')->createPremiumCharge($this->getUser(), $form->get('token')->getData());
  $redirect = $this->get('session')->get('premium_redirect');
} catch (\Stripe\Error\Base $e) {
  $this->addFlash('warning', sprintf('Unable to take payment, %s', $e instanceof \Stripe\Error\Card ? lcfirst($e->getMessage()) : 'please try again.'));
  $redirect = $this->generateUrl('premium_payment');
} finally {
  return $this->redirect($redirect);
}
Note: If you're interested how we know where to redirect the user, please see the PostVoter and AccessDeniedHandler implementations, as well as how to create a custom handler.
Because we're catching Stripe exceptions we can display any card-related issues in a flash message to inform the user that their payment wasn't successful:
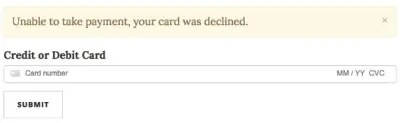
Note: None of the card information is re-populated because it was never processed by our Symfony form.
Dealing with refunds
It's possible that the user will request and be granted a refund for the charge, in which case we should automatically revoke their premium access. Stripe offers webhooks (HTTP callbacks) so that we can be notified about events happening in our account. This presents the perfect opportunity to use Symfony's event dispatcher component so that our web app can gracefully react to them.
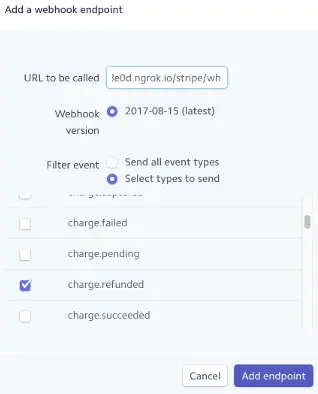
To begin with, visit the webhook dashboard and register a new endpoint with the URL http://xxxxxxxx.ngrok.io/stripe/wh (remember to replace xxxxxxxx with your actual ngrok ID). For now we'll filter the events we're interested to just charge.refunded (it's always possible to edit the endpoint to include more events as and when you need to handle them):
Once created, you should be able to reveal a signing secret which needs to go into parameters.yml:
parameters:
    # ...
    stripe_signing_secret: whsec_xxxxxxxxxxxxxxxxxxxxxxxxxxxxxxxx
Next we'll create a simple Symfony event object that will wrap the Stripe library's own event object. Create a new file in src/AppBundle/Event/ called StripeEvent.php and add the following code:
<?php

namespace AppBundle\Event;

use Stripe\ApiResource;
use Stripe\Event;
use Symfony\Component\EventDispatcher\Event as BaseEvent;

class StripeEvent extends BaseEvent
{
  protected $event;

  /**
   * @param Event $event
   */
  public function __construct(Event $event)
  {
    $this->event = $event;
  }

  /**
   * @return string
   */
  public function getName()
  {
    return $this->event->type;
  }

  /**
   * @return ApiResource
   */
  public function getResource()
  {
    return $this->event->data->object;
  }
}
Then we'll create a controller action to serve as our webhook's endpoint. Security is an important consideration since we don't want to unconditionally trust notifications that may have been sent by a malicious third party. Thankfully, Stripe signs their webhook requests and the PHP library verifies the payload using our signing secret when constructing their event object.
Create a new file in src/AppBundle/Controller/ called StripeController.php and add the following code:
<?php

namespace AppBundle\Controller;

use AppBundle\Event\StripeEvent;
use Sensio\Bundle\FrameworkExtraBundle\Configuration\Route;
use Stripe\Error\SignatureVerification;
use Stripe\Webhook;
use Symfony\Bundle\FrameworkBundle\Controller\Controller;
use Symfony\Component\HttpFoundation\Request;
use Symfony\Component\HttpFoundation\Response;
use Symfony\Component\HttpKernel\Exception\BadRequestHttpException;

/**
 * @Route("/stripe")
 */
class StripeController extends Controller
{
  /**
   * @Route("/wh", name="stripe_webhook")
   */
  public function webhookAction(Request $request)
  {
    $header = 'Stripe-Signature';
    $signature = $request->headers->get($header);

    if (is_null($signature)) {
      throw new BadRequestHttpException(sprintf('Missing header %s', $header));
    }

    try {
      $event = new StripeEvent(Webhook::constructEvent($request->getContent(), $signature, $this->getParameter('stripe_signing_secret')));
    } catch (\UnexpectedValueException $e) {
      throw new BadRequestHttpException('Invalid Stripe payload');
    } catch (SignatureVerification $e) {
      throw new BadRequestHttpException('Invalid Stripe signature');
    }

    $this->get('event_dispatcher')->dispatch($event->getName(), $event);

    return new Response();
  }
}
Important: Once again, this route should be served over HTTPS to help mitigate attacks where event notifications are modified (even though the request signature is being validated).
Once the event has been dispatched we need an event subscriber to handle it. Handling the charge.refunded event will be fairly straightforward: we find a premium user with the given charge ID and, if they are found, set their premium status to false.
Let's begin by implementing a repository method to find the relevant user. Add the following method to UserRepository.php:
public function findPremiumByChargeId($chargeId)
{
  return $this
    ->createQueryBuilder('u')
    ->andWhere('u.premium = :premium')
    ->andWhere('u.chargeId = :chargeId')
    ->setParameters([
      'premium' => true,
      'chargeId' => $chargeId,
    ])
    ->getQuery()
    ->getOneOrNullResult();
}
Next, create a new file in src/AppBundle/EventSubscriber/ called StripeEventSubscriber.php and add the following code:
<?php

namespace AppBundle\EventSubscriber;

use AppBundle\Entity\User;
use AppBundle\Event\StripeEvent;
use Doctrine\ORM\EntityManagerInterface;
use Stripe\Charge;
use Symfony\Component\EventDispatcher\EventSubscriberInterface;

class StripeEventSubscriber implements EventSubscriberInterface
{
  private $em;

  public function __construct(EntityManagerInterface $em)
  {
    $this->em = $em;
  }

  public static function getSubscribedEvents()
  {
    return [
      'charge.refunded' => ['onChargeRefunded'],
    ];
  }

  public function onChargeRefunded(StripeEvent $event)
  {
    /** @var Charge $charge */
    $charge = $event->getResource();

    if ($charge->refunded) {
      $user = $this->em->getRepository(User::class)->findPremiumByChargeId($charge->id);

      if ($user) {
        $user->setPremium(false);
        $this->em->flush();
      }
    }
  }
}
Don't forget to register the event subscriber in the container by adding the following to services.yml:
app.subscriber.stripe_event:
    class: AppBundle\EventSubscriber\StripeEventSubscriber
    arguments: ['@doctrine.orm.entity_manager']
    tags:
        - { name: kernel.event_subscriber }
On a final note, Stripe mentions it's best practice to make event handling idempotent by logging the events you have processed to avoid handling duplicate webhook messages (which can happen on occassion), but in the interest of time I'll leave this as an exercise!
Conclusion
That's the end of our Stripe integration. We've used their client-side library to embed a widget that securely captures card payment details and returns a token. We've then used their server-side library to take that token and create card charge from it, upgrading the user to premium if it was successful. Finally, by handling the use-case of a user requesting and receiving a refund, we've learned how to validate and respond to Stripe events happening in our account.
Fast track your bespoke software project with us
"Codevate was the only company who ‘got’ our idea. We’ve worked with them to incrementally digitise most of our business processes with bespoke software."
- Complimentary scoping call
- At-a-glance feasibility analysis
- No obligation high-level proposal
- Work with an expert to evolve your idea