Driving user engagement by leveraging Disqus in Symfony-based web apps
Enhance social interaction in your web development projects by integrating Disqus comments in Symfony-based applications.
Engaging your audience is an ever-increasing concern when publishing content, since having a community that visitors can witness and interact with can help drive repeat traffic to your website. One such approach would be to let users write comments about your content, creating discussion that others can engage with. The temptation to implement your own comment system is strong since at a surface level it's a simple problem to solve, but to build a robust solution that can deal with moderation requirements such as banning & blocking users, editing comments, or just exploring related threads within a forum can easily turn your "users can write comments" requirement into another project in its own right.
Disqus to the rescue. Already used by many publishers to build and engage with their audiences, this popular commenting platform offers many different ways of integrating with a website for free. Features include comment moderation, analytics to help understand your audience, and native advertising to earn revenue.
To help illustrate how we can leverage Disqus by deploying it to an existing website, I've developed a minimal project that lists and displays blog posts with a user login system. Therefore, this article serves as a tutorial on how to modify this project to:
- Register a website with Disqus.
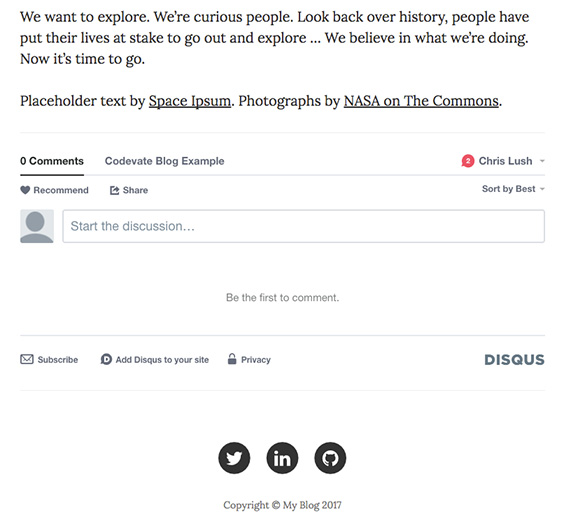
- Embed the Disqus comment system below blog posts so visitors can engage with them.
- Integrate Single Sign-On so existing users won't have to create a Disqus account to comment.
- Display comment counts next to blog titles on the homepage, demonstrating an active community.
Registering with Disqus
Before we can write some code, we'll first have to log in to Disqus (sign up if you don't have an account yet) and create a new site. The website name you input will create a "shortname" which is essentially a unique identifier that groups discussions together on the Disqus network, creating your very own forum. For example, inputting "Codevate Blog Example" will result in the shortname "codevate-blog-example" (you may find a number is appended to the end which is absolutely fine). Skip straight to step 3 (Configure Disqus) and complete the setup.
Embedding the Disqus universal code
Let's begin by embedding Disqus on our blog post page so that users already logged into the platform can start commenting. We could place the Javascript in the template itself but that'll require our controller to take on the responsibility of passing additional context and generating an HMAC signature as part of the SSO integration, not very reusable! Instead, we should create a Twig extension to render the embed code for a better separation of concerns.
We'll need to provide three important pieces of information: an identifier, URL, and title. The identifier is used to look up a thread belonging to your shortname, so if Disqus can't find it then one will be created automatically. It's important that the identifier is unique or you may find the same comments appear on multiple pages; for this example I've used both the post's database ID and a prefix (e.g. "post_1") in the event we want commenting on other types of content in the future. If a URL and title aren't specified then these values are taken from window.location.href and <title> respectively when creating the thread, which can be unreliable since the URL may have an irrelevant query-string in it or your title tag doesn't match the blog post's, so it's best we provide this ourselves. It's also recommended that the URL is unique; in the example project the blog post URLs follow the routing scheme {id}-{slug} which allows URLs with different slugs such as /blog/1-test to still work (useful if you want to change the title and not break existing links), so I've used a route that requires just the post ID for Disqus to use when linking to different comment threads.
class DisqusExtension extends \Twig_Extension
{
  private $twig;
  private $router;
  private $config;

  public function __construct(\Twig_Environment $twig, RouterInterface $router, array $config)
  {
    $this->twig = $twig;
    $this->router = $router;
    $this->config = $config;
  }

  public function getFunctions()
  {
    return array(
      new \Twig_SimpleFunction('disqus_embed', array($this, 'renderEmbed'), array('is_safe' => array('html'))),
    );
  }

  public function renderEmbed(Post $post)
  {
    return $this->twig->render(':disqus:_embed.html.twig', array(
      'shortname' => $this->config['shortname'],
      'identifier' => sprintf('post_%d', $post->getId()),
      'title' => $post->getTitle(),
      'url' => $this->router->generate('blog_post_redirect', array('id' => $post->getId()), UrlGeneratorInterface::ABSOLUTE_URL),
    ));
  }
}
View on GitHub
By declaring renderEmbed as a Twig templating function that outputs HTML (using the is_safe option), we're able to dynamically render the Disqus universal code with our own parameters in a separate template.
<div id="disqus_thread"></div>
<script type="text/javascript">
  var disqus_config = function () {
    this.page.identifier = '{{ identifier }}';
    this.page.title = '{{ title }}';
    this.page.url = '{{ url }}';
  };

  (function() {
    var d = document, s = d.createElement('script');
    s.src = '//{{ shortname }}.disqus.com/embed.js';
    s.setAttribute('data-timestamp', +new Date());
    (d.head || d.body).appendChild(s);
  })();
</script>
<noscript>Please enable JavaScript to view the <a href="https://disqus.com/?ref_noscript" rel="nofollow">comments powered by Disqus.</a></noscript>
View on GitHub
Speaking of which, we'll also need to add the Disqus shortname we created earlier to parameters.yml.
parameters:
    disqus:
        shortname: codevate-blog-example
We'll also need to register our extension in services.yml to inject this new parameter and the other necessary services.
services:
    app.twig.disqus_extension:
        class: AppBundle\Twig\DisqusExtension
        public: false
        arguments: ["@twig", "@router.default", "%disqus%"]
        tags:
            - { name: twig.extension }
View on GitHub
Finally, we can simply call our new function in the template that renders our blog post.
{{ disqus_embed(post) }}
View on GitHub
Integrating Single Sign-On
Single Sign-On (SSO) allows users logged into your website to use Disqus seamlessly without having to re-authenticate or create a Disqus account themselves. However, SSO not enabled by default so you'll have to use this contact form. Select your Disqus site/forum and then select "Enable SSO" under "What can we help you with?" - currently I don't know of any way to enable SSO without using this contact form, so ask nicely!
Once enabled you'll need to visit the SSO page and configure the remote domain. This step is important as the remote domain is permanent and non-transferable (at the time of writing it is only possible to create one remote domain per user account). However, this is your "SSO domain" rather than a website domain, so essentially it's another unique identifier to isolate created user accounts (much like the relationship between shortnames and threads).
Next, we'll need to register a new API application, entering a name (e.g. My Blog), description (e.g. SSO integration), and your website's domain name. You should be redirected to the application's settings page where you'll then need to enter the actual domain(s) your website uses (one per line) and choose the SSO domain we just created, saving the changes made.
Finally, go to the application's details page (or the applications list) and add both the API Key (public key) and API Secret (secret key) to parameters.yml.
parameters:
    disqus:
        shortname: codevate-blog-example
        api_key: changemeZMrBdumSNwro2NJJynbfIquC5GbvMqnFs9gT7XOiXb3rbDaFChtoanTK
        api_secret: changemeAzkpnN5vywqNxFFVkdAp0fvFFLNNQvvcTkJyc518MLy2s7E0JYh3BXI3
We'll need to refactor our Twig extension so we can pass along an HMAC-SHA1 signed message so Disqus can authenticate our users. If a user isn't logged in then an empty (but still signed) message must be passed instead, ensuring that they're logged out of Disqus. So when a user is logged in we'll need to provide three key pieces of information: an ID, username, and email address. The ID must be unique so we'll just use our user's database ID. The username is not actually their Disqus username (which is generated automatically), rather it's the display name shown when they make a comment. In the example project I've used their first & last name, however you could use their real username, or maybe the first part of their email address with strtok($user->getEmailCanonical(), '@').
private function getHmacSignature()
{
  $data = array();

  if (($token = $this->tokenStorage->getToken()) && ($user = $token->getUser()) && $user instanceof User) {
    $data['id'] = $user->getId();
    $data['username'] = $user->getFullName();
    $data['email'] = $user->getEmailCanonical();
  }

  $message = base64_encode(json_encode($data));
  $timestamp = time();

  return sprintf('%s %s %s', $message, hash_hmac('sha1', sprintf('%s %s', $message, $timestamp), $this->config['api_secret']), $timestamp);
}
View on GitHub
We'll then update the embed code template to include the signed message and public API key.
return $this->twig->render(':disqus:_embed.html.twig', array(
  'hmac_signature' => $this->getHmacSignature(),
  'api_key' => $this->config['api_key'],
  // ...
));
View on GitHub
Now we need to add the extra SSO extra parameters to the Javascript Disqus config. It's worth providing login and logout URLs so your users have the option to do this through Disqus instead. Also, if your users can choose an avatar you can carry it over by providing a URL with the avatar parameter.
var disqus_config = function () {
  this.page.remote_auth_s3 = '{{ hmac_signature }}';
  this.page.api_key = '{{api_key }}';
  this.sso = {
    name: 'Codevate Blog Example',
    url: '{{ url('fos_user_security_login') }}',
    logout: '{{url('fos_user_security_logout') }}',
    width: '800',
    height: '600'
  };
  // ...
};
View on GitHub
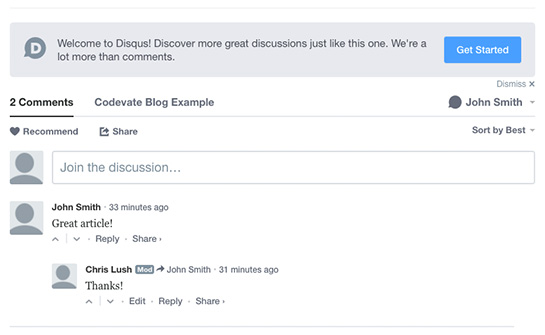
Now when visting a blog post page while logged in, our test user is automatically authenticated and able to comment straight away without having to visit Disqus.
Adding comment counts
Last but not least, let's explore including a comment count to the blog post links on our homepage to show that users are engaging with our content, demonstrating an active community.
Let's first modify our Twig extension to register another templating function in getFunctions().
return array(
  new \Twig_SimpleFunction('disqus_count', array($this, 'renderCount'), array('is_safe' => array('html'))),
  // ...
);
View on GitHub
Both the function and template are very simple as all we need to do is include their Javascript library using our shortname.
public function renderCount()
{
  return $this->twig->render(':disqus:_count.html.twig', array(
    'shortname' => $this->config['shortname'],
  ));
}
View on GitHub
<script id="dsq-count-scr" src="//{{ shortname }}.disqus.com/count.js" async></script>
View on GitHub
I've opted to use another templating function rather than directly include the script at the bottom of the base template so the responsibility remains with the extension, avoiding the need to expose the shortname as a global Twig variable.
{{ disqus_count() }}
</body>
</html>
View on GitHub
Finally, we'll need to add some markup to the list to display the comment count for each blog post. Using a link has the advantage of being able to navigate directly to the comment section, however, you can also use <span> and <div> elements if you add the disqus-comment-count class to them. Note that the data-disqus-identifier attribute value needs to be the same as the one used in the embed code for that post.
<a href="{{path('blog_post', {id: post.id, slug: post.slug}) }}#disqus_thread" data-disqus-identifier="post_{{post.id }}"></a>
View on GitHub
Now we have some nice-looking comment counts below our blog titles, adding a bit more life to them. You can update the count text by visting your community page.

Wrap-up
In this article we've learnt a bit more about how Disqus works and how to modify an existing Symfony project to leverage the commenting platform in a clean and extensible manner. We also implemented Single Sign-On so that existing users logging into our website won't have to sign up for a separate Disqus account in order to start commenting. Lastly, we displayed comment counts on the homepage to show that users are engaging with our content.
Fast track your bespoke software project with us
"Codevate was the only company who ‘got’ our idea. We’ve worked with them to incrementally digitise most of our business processes with bespoke software."
- Complimentary scoping call
- At-a-glance feasibility analysis
- No obligation high-level proposal
- Work with an expert to evolve your idea